Transforming Balcony Railings into Efficient Solar Power Generators
Balcony railings offer untapped potential beyond supporting plants or providing safety. These structures can generate electricity for your apartment through the integration of transparent solar panels. Such panels enable the creation of compact energy systems that power lighting, device charging, or contribute to reducing utility expenses, all while preserving the aesthetic and functional aspects of your outdoor space.
This comprehensive guide details the principles behind transparent solar railings, their operational mechanics, and practical implementation strategies. Readers gain insights into essential tools, safety protocols, professional involvement when necessary, and maintenance practices to ensure long-term performance and reliability.
Understanding Transparent Solar Railings
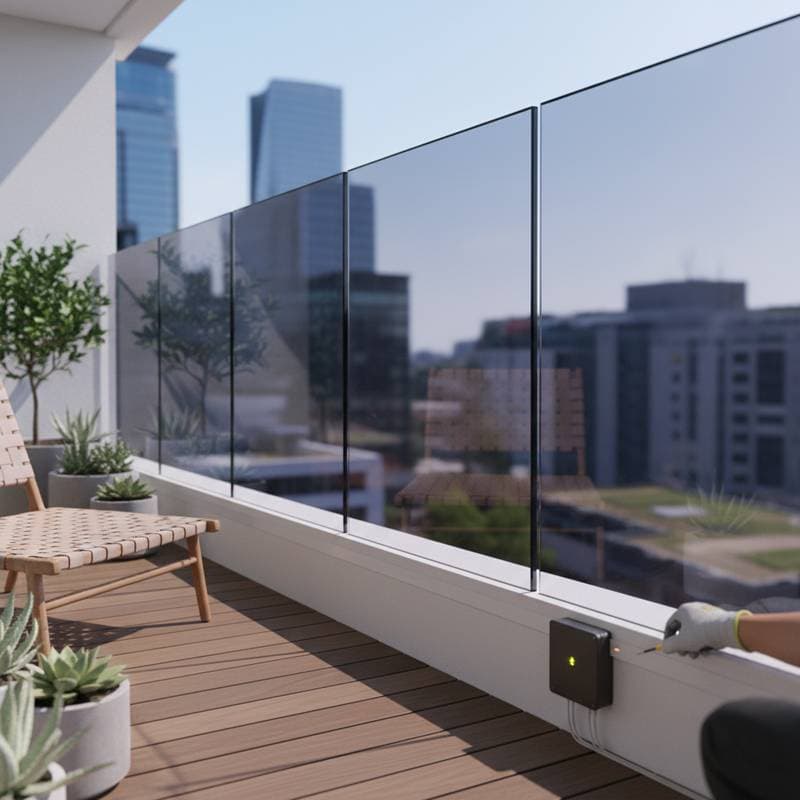
Transparent solar panels consist of advanced photovoltaic materials embedded in a glass-like substrate. These materials capture ultraviolet and infrared light wavelengths for energy conversion, while allowing visible light to transmit through, maintaining transparency levels up to 90 percent. Integrated into balcony railings, the panels serve dual purposes as structural elements and electricity producers.
Energy yield varies based on panel dimensions and sunlight exposure. For instance, a standard six-foot railing section typically generates 80 to 120 watts during peak sunlight hours. In a complete balcony installation, this capacity supports moderate loads such as powering a laptop, LED lights, or a portable fan, proving particularly valuable in dense urban settings where rooftop solar options remain inaccessible.
Essential Tools and Materials
Assemble the following items prior to commencing the project to facilitate a smooth installation process:
- Transparent solar panels, custom-cut to match railing dimensions
- Weather-resistant mounting brackets designed for exterior applications
- Low-voltage wiring equipped with sealed, waterproof connectors
- Charge controller to regulate electricity flow and prevent overcharging
- Deep-cycle battery for storage or a grid-tie inverter for direct utility integration
- Drill, screwdriver set, and protective gloves for handling
- Multimeter to verify electrical output and connections
Optimal performance requires a balcony receiving direct sunlight for a minimum of four hours daily. South-facing orientations yield the highest returns, whereas north-facing or shaded locations experience significantly reduced efficiency, often by 50 percent or more.
Installation Process
Follow these sequential steps to integrate solar panels into your balcony railing effectively.
- Measure the railing precisely. Document the height and width in inches to ensure panels align without obstructing water drainage channels or impeding emergency egress paths.
- Assess structural integrity. Railings constructed from metal or tempered glass support the added weight of solar panels, approximately 2 to 3 pounds per square foot. For wooden or thin steel variants, consult load-bearing specifications or a structural engineer to avoid compromise.
- Map the wiring route. Route cables through protective conduit along the railing base or beneath the handrail, minimizing exposure to elements and preventing damage from sharp edges or abrasion.
- Secure the mounting brackets. Fasten with corrosion-resistant stainless steel bolts and washers, applying torque sufficient for stability without risking damage to surrounding materials.
- Position the panels. Insert each panel into the designated brackets and engage the locking mechanisms. Use gloves throughout to avoid surface scratches or residue that could impair light transmission.
- Wire the components. Connect panels in series for higher voltage or parallel for increased current, targeting 12 or 24 volts suitable for small-scale balcony systems.
- Incorporate the charge controller and battery. House these elements in a sealed, weatherproof enclosure positioned near an indoor power source, elevated above potential moisture accumulation on the balcony surface.
- Validate the system. Employ the multimeter to measure voltage and current output, accounting for minor fluctuations due to passing clouds or varying light angles.
Key Safety Considerations
Prioritize safety to mitigate risks during and after installation.
- Disconnect all power sources before attaching or detaching electrical components.
- Select tools with double insulation specifically certified for electrical tasks.
- Refrain from overhanging the railing while panels remain unsecured.
- Restrict access to the area for children and pets throughout the setup phase.
- Perform cleaning with a solution of mild soap and water, avoiding abrasive materials that could etch the panel surface.
Common Troubleshooting Scenarios
Address performance issues systematically to restore functionality.
If output voltage appears low:
- Evaluate shading effects, as even partial obstruction from nearby foliage or fixtures can diminish production by up to 30 percent.
- Examine all connectors for looseness or corrosion, which frequently lead to energy dissipation.
- Remove accumulated dust, pollen, or residues from the panel exterior to reinstate full light absorption.
- Verify wiring polarity, as incorrect orientation halts energy transfer entirely.
For batteries failing to retain charge, isolate and test with an external charger. Initiate replacement if the resting voltage falls below 11 volts following a complete charging cycle.
Cost Estimates and Timeline
A basic setup for an eight-foot balcony railing typically ranges from 400 to 700 dollars. Transparent solar panels constitute the primary expense, with ancillary costs including brackets, wiring, and regulatory components. Allocate three to five hours for completion, factoring in railing configuration and individual familiarity with assembly tasks.
Ongoing Maintenance Practices
Conduct monthly surface wipes to eliminate contaminants and preserve transparency. In regions prone to high winds, inspect and retighten bracket fasteners biannually. Ensure the charge controller enclosure remains sealed against moisture and free from obstructing debris. Monitor battery health annually, replacing units when capacity degrades to 50 percent of initial specifications. These routines sustain system efficiency at approximately 90 percent over time.
Engaging Professional Assistance
Seek a certified electrician for integrations involving the building's main electrical system. Professionals handle grid-tie inverter installations, code adherence, surge safeguards, and grounding protocols. Renters must obtain explicit permission from property management for any modifications altering the railing structure.
Realizing Your Solar Balcony Vision
Implementing transparent solar railings empowers urban dwellers to embrace renewable energy without major renovations. This approach not only curtails electricity dependence but also aligns with sustainable living principles. Start with a site assessment to confirm feasibility, then proceed confidently to build a resilient, eco-friendly power source tailored to your space.