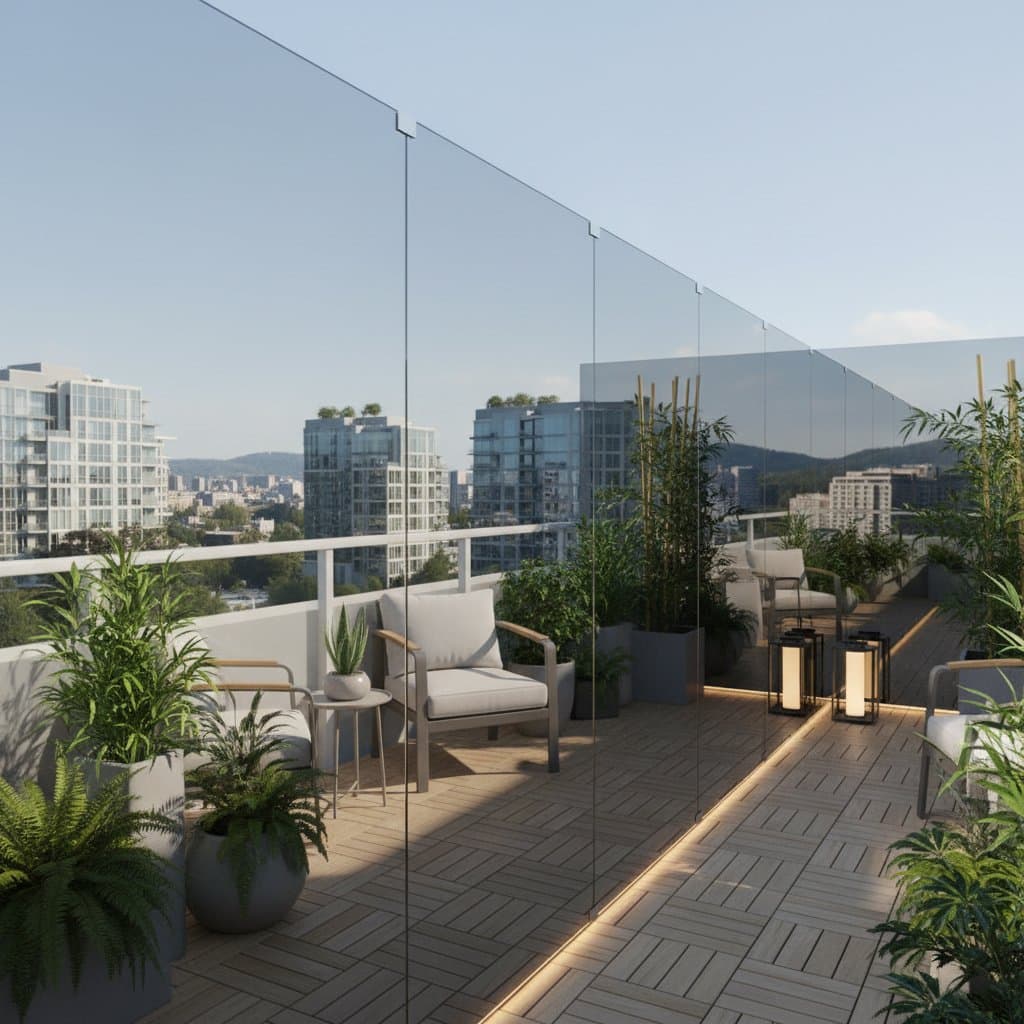
Mirror Fences Double Balcony Space With Visual Illusion
A small balcony can feel boxed in. You may step outside looking for air and find the walls closing in instead. The solution many city residents now use is the mirror fence. This surface reflects light and view to make a balcony look and feel twice its size. The goal is more openness without changing the actual footprint.
This guide shows what mirror fences are, how they work, and how to install one safely on a budget.
Overview
A mirror fence is a vertical surface, often made with mirrored acrylic or tempered glass panels, fixed to a railing or wall. It reflects the opposite view so the eye reads the space as extending beyond its boundary. The effect can double the visual width or depth of a balcony, especially when natural light hits it from the right angle.
The benefit is not just the illusion of size. A mirror fence brightens shaded corners, softens hard edges, and gives plants or furniture a more balanced setting. You can also use mirrors to frame skyline views or reflect green from nearby trees. For small urban balconies, this is one of the fastest ways to turn a tight ledge into a calm outdoor room.
In this article, you will learn how to choose mirror materials, mount them safely, and maintain their shine through the seasons.
Tools and Materials
Before starting, gather the right items. You will need mirrored acrylic panels or tempered mirrored glass cut to fit your railing or wall. Acrylic is lighter, about 50 percent less weight than glass, and safer if dropped. You will also need mounting brackets or clips suited to your balcony railing type. Stainless steel resists rust.
Other essentials include a measuring tape at least 10 feet long, a level, a pencil, and a drill with masonry or metal bits. Add weatherproof sealant and clear edge trim to protect mirror edges from moisture. Keep microfiber cloths, mild soap, and a soft sponge on hand for cleaning. Wear protective gloves and eye protection for cutting or drilling.
If you plan to cover a full railing, estimate one mirror panel for every 3 feet of length. Most balconies need 3 to 5 panels depending on layout.
Steps
Step 1: Measure and Plan the Layout
Start by measuring the full width and height of the railing or wall where the mirror panels will go. Mark the center line. A balanced layout with even spacing keeps the reflection symmetrical. Allow at least 1 inch gap between panels for expansion and airflow.
Look at what will be reflected. You want light, plants, or skyline views, not clutter or nearby windows. Stand at the main entry to your balcony and visualize the reflection line. Adjust your plan until the mirrored view feels open and pleasant.
Step 2: Choose the Mirror Type
Pick mirrored acrylic if you want a lightweight, affordable, and easy-to-cut surface. It is flexible and safer for high balconies. Choose tempered mirrored glass if you prefer a crisp reflection and higher scratch resistance. The weight is greater, so use stronger brackets rated for at least 20 pounds per panel.
For outdoor use, select mirrors labeled UV-resistant and weather-sealed. These resist clouding and peeling from sun, rain, and temperature shifts.
Step 3: Prepare the Surface
Clean the railing or wall with mild soap and water. Remove dust, rust, or peeling paint. Let it dry fully. A clean surface ensures the adhesive or brackets grip well. Check that your railing is stable and meets building safety codes before adding any extra weight.
Step 4: Mount the Mirrors
Hold the first panel in place. Use the level to keep it straight. Mark the drill points for brackets or clips. Drill carefully, wearing eye protection. Apply a bead of sealant behind each bracket to block moisture. Secure the panel, then attach the trim to protect edges.
Continue panel by panel, checking alignment often. Tighten screws gently to avoid cracking acrylic or glass. If your balcony wall is concrete, use masonry anchors. For wood or metal rails, self-tapping screws work best.
Step 5: Check Reflection and Adjust
Step back and look from different angles. The reflection should extend your space in a clear line, not distort it. Slightly tilt panels inward or outward if needed. A tilt of 5 to 10 degrees can direct reflected light into darker corners and reduce glare.
Step 6: Seal and Finish
Run a thin line of clear sealant along top and side edges to block water. Wipe off excess with a damp cloth. Let it cure as directed. Add plants or small furniture in front of the mirror fence to soften the look. Ferns, grasses, or trailing vines work well because they break up the reflection naturally.
Safety Tips
Avoid direct sunlight glare. Position mirrors where they do not reflect into your or a neighbor's window. Check weight limits. Balcony railings have load ratings, often around 50 pounds per linear foot. Stay below that. Wear gloves when handling glass or sharp-edged acrylic. Do not lean heavy furniture directly against the mirrors. Secure loose cables or hooks away from reflective surfaces to prevent heat buildup from sunlight.
If you feel unsure about drilling or weight limits, call a licensed installer. They can mount the panels using approved anchors for your building type.
Troubleshooting
Mirror panels fog or streak. Clean with diluted vinegar and a microfiber cloth. Avoid ammonia-based cleaners that can damage coatings. Panels rattle in wind. Add rubber washers behind brackets or apply a thin bead of clear silicone at contact points.
Reflection feels harsh or dizzying. Angle panels slightly downward or place tall plants to break the line. Balance bright and shaded areas. Moisture collects behind panels. Drill small drain holes at the bottom edge of brackets and reseal top edges to block rain.
Maintenance and Storage
Wipe mirrors once a week if exposed to dust or rain. Use mild soap and water with a soft cloth. Inspect brackets each season to be sure they stay tight and rust-free. If you remove panels for winter, store them upright in a dry indoor space. Separate each with cardboard or foam sheets to prevent scratches.
Budget and Time
A mirror fence project costs roughly 20 to 40 dollars per 2-by-4-foot sheet of mirrored acrylic. Tempered mirrored glass runs 50 to 90 dollars per panel of the same size. Brackets, trim, and sealant add 30 to 60 dollars total. Tools and safety gear cost about 40 dollars if you need to buy them.
A small balcony can usually be covered for 150 to 300 dollars using acrylic, or up to 400 dollars with glass. Expect about three to five hours of work for a full installation if you have help.
Seasonal Reminders
In spring, wash the panels after winter dust. Inspect sealant lines for cracks. Tighten brackets before the first heavy rain. In summer, watch for glare and adjust plant placement. Keep surfaces cool with shade fabric if the balcony faces direct sun.
In fall, remove leaves that stick to mirrors. Clean and dry before colder nights to prevent condensation stains. In winter, remove acrylic panels if your area freezes to avoid brittleness. Cover glass panels with clear film for frost protection.
When to Call a Pro
Call a professional installer or glazier if you live above the sixth floor and wind loading is strong. The same applies if you use heavy glass panels larger than 4 feet wide. Your building may require approval for balcony modifications. You may also need anchors drilled into concrete or structural steel.
Ask for their experience with exterior mirrored surfaces, the hardware rating for outdoor wind, and proof of safety compliance. A pro can also polish edges and apply anti-glare film for better comfort.
Planning Your Installation
Measure your balcony railings and sketch where reflections will look best. Choose your mirror type based on weight, cost, and reflection clarity. Gather materials and schedule a half day for installation. Test angles with a small sample before mounting all panels. Keep up with cleaning and seasonal checks to preserve the illusion.
A mirror fence is a small upgrade that brings big change. It transforms a cramped balcony into a space that feels open, bright, and connected to the city outside.