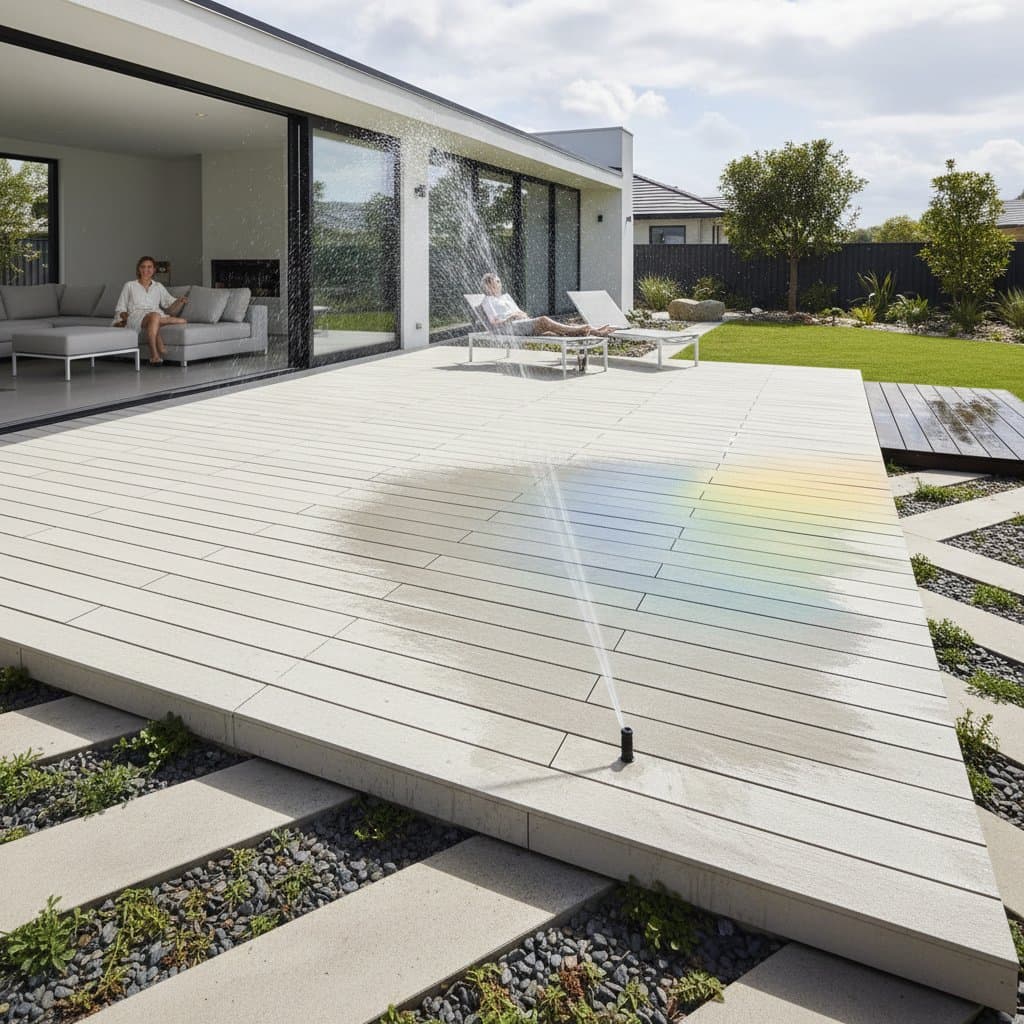
6. Finish Edges and Test Drainage
Install trim boards or pavers around the perimeter to create a clean, finished appearance for the deck. Once the framing and surfacing are complete, perform a drainage test by pouring a bucket of water onto the surface. The water should percolate through the gaps rapidly without forming pools. If water remains on the surface, inspect the gaps for obstructions such as debris or sediment buildup, and identify any low areas that prevent proper flow.
To address minor issues during testing, level the surface slightly if needed by adjusting the supporting gravel base. This step ensures the deck functions as intended from the first use, promoting longevity and user satisfaction.
Troubleshooting Common Issues
Permeable decks offer durability, yet occasional problems may arise due to environmental factors or installation variables. The following guide addresses frequent concerns with clear causes and targeted solutions.
Problem: Water Pools Between Boards
This issue often stems from gaps clogged with leaves, dirt, or a thin layer of surface residue that impedes infiltration.
Solution: Employ a plastic scraper or a narrow-bristled brush to dislodge and remove the debris carefully. Follow up by rinsing the area thoroughly with a standard garden hose at low pressure. High-pressure washers can embed particles deeper into the joints, complicating future cleaning efforts. Regular vigilance prevents recurrence, especially in areas prone to leaf fall.
Problem: Deck Surface Feels Warmer Than Anticipated
Excessive heat can result from boards in dark hues that absorb sunlight or from insufficient airflow beneath the structure, trapping warm air.
Solution: Introduce shade elements such as retractable fabric covers or position light-colored, permeable rugs over high-traffic zones to reflect heat. Enhance under-deck ventilation by pruning nearby vegetation and ensuring at least six inches of clearance around the base. These adjustments can reduce surface temperatures by up to 20 degrees Fahrenheit on sunny days.
Problem: Uneven Settling or Sagging Boards
Instability typically occurs when the underlying gravel base lacks proper compaction or when heavy rains cause soil erosion beneath the foundation.
Solution: Identify and remove the affected boards to access the frame. Elevate the frame temporarily, then add and compact fresh gravel in layers of two inches each time until the base restores its firmness. Reinstall the boards securely, checking for level alignment. For extensive settling, consult local soil reports to understand erosion risks specific to your region.
Problem: Mold Growth or Persistent Odor Beneath the Deck
These signs indicate trapped moisture from inadequate drainage or restricted air circulation, creating a damp environment conducive to microbial growth.
Solution: Examine all drainage outlets and channels for blockages, clearing them with a gentle stream from a hose. Install small ventilation openings or a continuous weep channel along one edge to facilitate airflow. Apply a natural antimicrobial treatment, such as diluted vinegar, to affected areas if mold appears, while ensuring the solution does not clog permeable features.
Ongoing Maintenance Practices
Although permeable decks require less upkeep than traditional solid surfaces, consistent care preserves their performance and aesthetic appeal. Establish a quarterly routine that takes no more than 30 minutes to complete, focusing on prevention to avoid larger repairs.
Clear Debris Regularly
Remove accumulated leaves, pollen, and dirt from the board gaps using a soft broom or leaf blower on a low setting. After significant rainfall events, rinse the entire surface with a garden hose to flush out sediments. Refrain from applying sealants or coatings unless the manufacturer specifies a permeable formula, as these can reduce water infiltration rates over time.
Examine Structural Integrity
Inspect all fasteners, such as screws and hidden clips, for signs of rust, corrosion, or loosening that could compromise stability. Scan the deck for sagging sections or channels filled with silt, which signal potential drainage issues. Tighten any loose hardware promptly and replace damaged components to maintain even load distribution.
Restore Surface Condition
Treat stubborn stains with a solution of mild detergent mixed with water, applied via a soft-bristled brush in gentle circular motions. Steer clear of harsh chemicals like bleach or solvents, which may degrade composite materials and affect permeability. If drainage slows in certain spots, lift those boards to refill and compact the gravel sub-base, ensuring uniform support across the installation.
With diligent maintenance, these decks demonstrate remarkable resilience, often enduring 25 years or longer with only routine interventions. Homeowners report sustained comfort and reduced environmental impact, making the effort worthwhile for long-term outdoor enjoyment.
Engaging Professional Assistance
Certain scenarios demand expertise beyond DIY capabilities to ensure safety, compliance, and optimal results. Professionals bring specialized knowledge of local regulations and advanced techniques.
Seek a contractor in these cases:
- The yard features a notable slope, complicating natural drainage paths and requiring precise grading calculations.
- The deck integrates with municipal stormwater infrastructure, necessitating permits and engineering approvals.
- Heavy loads, such as a hot tub or substantial outdoor furniture, demand reinforced framing to prevent structural failure.
- Evidence of soil erosion or water redirecting toward the home foundation indicates underlying geotechnical challenges.
When selecting a professional, inquire about their track record with permeable installations and cool composite products. Request documentation of drainage performance tests from prior projects, particularly in comparable soil types. A qualified expert will discuss key elements like recommended slope percentages, required gravel depths for load-bearing, and optimal spacing for ventilation, providing transparency throughout the process.
Steps to Launch Your Project
Transition from planning to action with these structured steps to bring your permeable deck to life efficiently.
- Design the Layout: Sketch the proposed deck area, incorporating paths or adjacent patios to maximize space utilization.
- Select Appropriate Materials: Choose composite boards engineered for minimal heat retention, verified through product specifications for thermal performance.
- Assess Site Conditions: Evaluate the terrain slope and soil composition; aim for a subtle one percent grade to guide water away from structures naturally.
- Schedule the Build: Allocate a weekend for construction, enlisting one or two assistants, and organize all materials nearby to streamline the workflow.
By following this approach, you create an outdoor haven that withstands urban challenges, enhances comfort, and supports sustainable practices for years ahead.